

In recent years the music industry has been under fire for its unsustainable practices. Music fans have scrutinised artists like Taylor Swift for the carbon emissions created by their tours and merchandise. Some artists and fans have been attempting to reduce their environmental impact by moving to more sustainable music consumption methods. One way in which music fans can reduce their environmental toll is by making DIY merch from up-cycled materials. This article will give you a step-by-step guide on how to DIY your own merch.
Environmentally Damaging Music Distribution
Discussions around the lack of sustainability in the music industry have risen in mainstream media in recent years. Recently in a Billboard interview, Billie Eilish criticised the way in which many of the biggest artists of the moment are releasing their music. A popular form of album release distribution is pumping out exclusive bundles or variations of the same vinyl/CD in different colours or with exclusive features, which Eilish strongly disagrees with. This interview held an even bigger magnifying glass on the music production of many major artist’s new releases.
Taylor Swift was 2023’s highest-grossing artist, so there’s been a large focus on how she distributes her music. Swift is the blueprint of what it takes to succeed in the music industry, but reevaluating the blueprint is long overdue. There’s no doubt Swift’s immense talent as a singer, songwriter and performer. However, her album releases are a major cause for environmental concern.
Swift and her team promote the overconsumption of merchandise, specifically vinyl, through her album releases. Her Midnights album dropped alongside several variations of the vinyl. The vinyls were in different colourways, and their sleeves, once put together, made an image of a clock. This was also the case for her latest album, The Tortured Poets Department, where each one of the four variations of vinyl contained a bonus track. This form of album distribution is mirrored by other popular artists across the music industry to increase album profit.
Experts expect the global revenue of music merchandise (including vinyl and CDs) to grow to $16.3 billion by 2030. If distribution continues as it is, companies will produce the vast majority of this growth unsustainably.
Some artists, such as Massive Attack, Coldplay and Billie Eilish, are working on reducing their carbon footprint. While still releasing vinyl, Eilish has opted to use 100% recycled black vinyl, which is packaged in a material made from sugar cane, a natural resource.
This sets a new standard for artists to follow when releasing new music for physical distribution.
Fan-Made Merch
Music fans have always acted on their fandom by wearing merchandise or dressing in the style of a music genre. Merch is a way to visibly display your fandom to others, showcasing a part of your personality. Wearing merch can act as an identifier, a conversation starter, and a relationship builder between fans. It gives people an insight into who you are, what music you like, and your personal style. Merch also acts as a way to support artists, especially when streaming platforms often do not pay liveable wages.

Dressing up for concerts is a huge part of the concert experience for many fans. Fans often post their concert outfits on social media for fan connection and inspiration. Many artists have begun creating themes for their concerts, including Chappell Roan. Chappell’s concerts alternate between five themes that fans create outfits around. This creates buzz and excitement around the preparation stage of the concert and makes fans feel more connected to the crowd and artist.
With concerns about the environmental impact of the textiles industry, many fans have been opting for more sustainable ways of creating concert outfits. One way in which fans are doing so is by thrifting and upcycling clothing to prevent the single-use nature of fast fashion outfits. Thrift stores have even been catering for concert fans by tailoring their displays to fit the clothing style of artists in town. Fans are also creating their own merch using clothing they already own, giving an old piece of clothing a new personality. This can be a great way of reducing your carbon footprint as a music fan whilst still visibly participating in fandoms.
Why Make Your Own Merch
Most companies do not source official merch sustainably, meaning DIY merch can combat the waste produced by the textiles industry. It also allows you to create merch that fits with your own personal style. This makes the merch more wearable and prevents the waste of single-use clothing.
Many fans complain about artist’s merch being “boring” or “ugly”, so fans can instead create their own interesting pieces. While making merch won’t directly support artists financially, it works as a form of free advertising for their music. It may even push more artists to look into sourcing ethical and sustainable merch with creative designs.
How to DIY Merch
Previously I have made DIY merch for a few of my favourite artists, such as Troye Sivan and Charli XCX. I tend to stick to patterns which I can wear casually as well as for concerts and club nights, so the item gets the most use possible. I love the process of making my own merch and would love to see more fans taking part.
Below, I have shared the steps and resources I used to create a Chappell Roan-inspired shirt. The top features the title of her hit song Hot To Go, inspired by a shirt I saw on Pinterest. The brand Oddli made this style of shirt popular by creating name t-shirts in a mismatched style.
Resources
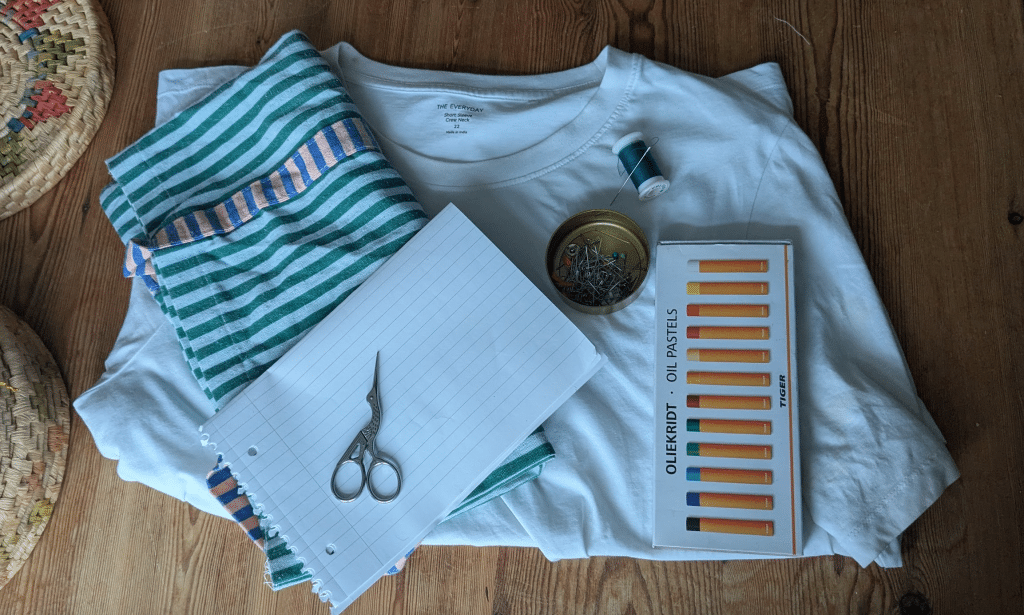
- A plain T-shirt (you can opt for something else like a dress or a bag)
- Scrap fabric for pattern (I am using an old tote bag; I’ve previously used old t-shirt fabric)
- Needle (you can use fabric glue or safety pins if you don’t want to sew)
- Thread
- Scissors
- Pins
- Tailor’s chalk (you can use anything that will leave a mark, but tailor’s chalk is preferred as it washes off. I used oil pastels but cut within the stencil so there would be no residue left)
- Paper/A stencil
- Pen or pencil
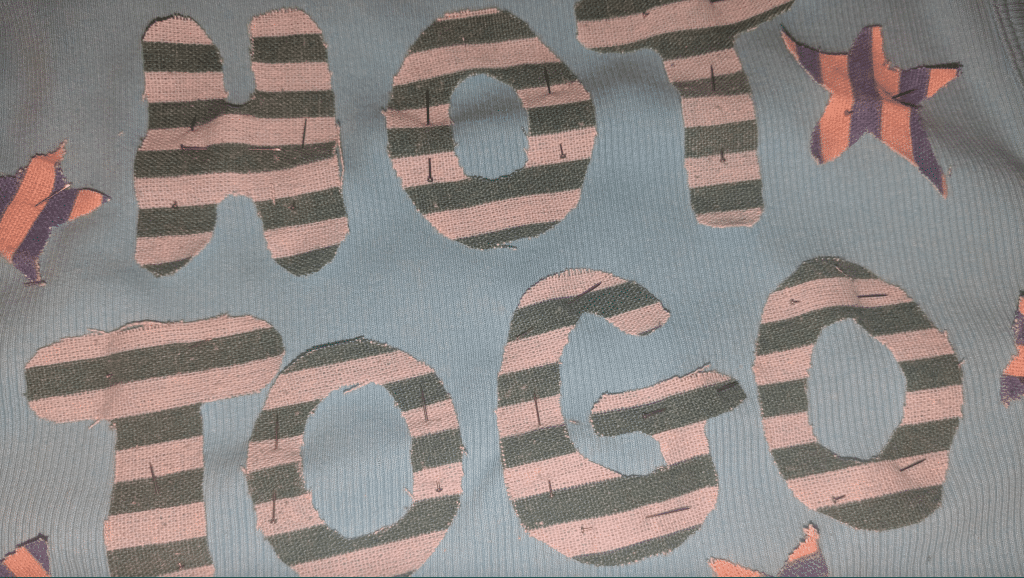
Step 1: Draw and Cut Out Your Stencil

To make a stencil for your merch, you can draw or write your design on a piece of paper. When designing a written top, you can reuse the same letters to cut down on waste and ensure consistency with the design. If you want a specific font from an album and don’t feel confident free-handling the design, you can print out the design and cut around it.
When it comes to cutting out letters like “O”, which are hard to cut around, the best way to do it is in the image above. When you fold the letter in half, you can cut within the gap, so once you unfold the paper, you’ll have an even cut.
Once your stencil is laid out, you can lay it on the design fabric, ready to outline.
Making a stencil is optional. If you want to freehand your design straight onto the fabric, that can be done as a less wasteful option.
Stage 2: Tracing Stencil Onto Fabric

Lay your stencil on the back side of your fabric. This will prevent the tracing marks from being seen once you sew the visible side onto the t-shirt.
Place letters reversed so that once the fabric is flipped, they will be readable. For this design in particular, the only letter I needed to reverse was “G”.
Now, use your tailor’s chalk to trace around the stencil. I suggest pinning the stencil onto the t-shirt to prevent it from moving around during this stage, but it’s not essential.
Once your pattern is traced, you can move on to the next stage.
Stage 3: Cutting and Placing the Design

Take your scissors and cut out the pattern you have made. Cut a few centimeters away from the traced stencil so that you can sew on the raw edge.
Once the design is cut out, you can begin placing it on your chosen canvas. Experiment with placement and move the design around as much as you want to get it exactly how you desire. You might also want to change canvases at this point, to something that suits the design better. I opted for a blue tank top rather than a white t-shirt after testing out the placement.
When you are happy with the placement, you can begin pinning the design onto the t-shirt. Make sure to only pin through the side of the t-shirt you are sewing the design on. That way, you can avoid pinning both sides of the t-shirt together.
At this stage, you are able to try on the t-shirt to see if the design is positioned correctly when worn. Be careful if you do choose to try on the design at this stage, as pins can be sharp. If you don’t want to try the t-shirt on, you can instead hold it up to your body to get an idea of how it will look.
If you are not happy with the placement, once you’ve tried it on, you can move it around and try again. You can move the placement of the design as much as you want during this stage to get it to your liking.
Stage 4: Sewing/Attaching the Design

Before you begin sewing, you need to choose the colour of the thread for your design. Choosing a contrasting colour of thread will add a pop of colour and a dynamic look to the design. If you are not a confident sewer, opting for a similar colour thread to the design is a good option. This option will hide messy sewing and blend into the fabric.
With your chosen thread and a needle, you can begin sewing. A running stitch is the most beginner-friendly stitch. Running stitches, while they work well with this type of DIY, will not prevent fraying of the design’s edges. Frayed edges can add a unique hand-made feel to a DIY; however, if you want to avoid this, the blanket stitch is the best option.
At this stage, you can choose to optionally glue or safety pin your design to your t-shirt. Safety pinning the design would add a Punk flair to the merch, a technique used most notably by Vivienne Westwood.
Once your design is secured onto the canvas, you can try it on. If anything needs moving around, you can unpick the thread, change the placement and repeat the sewing stage.
Stage 5: Style the Merch
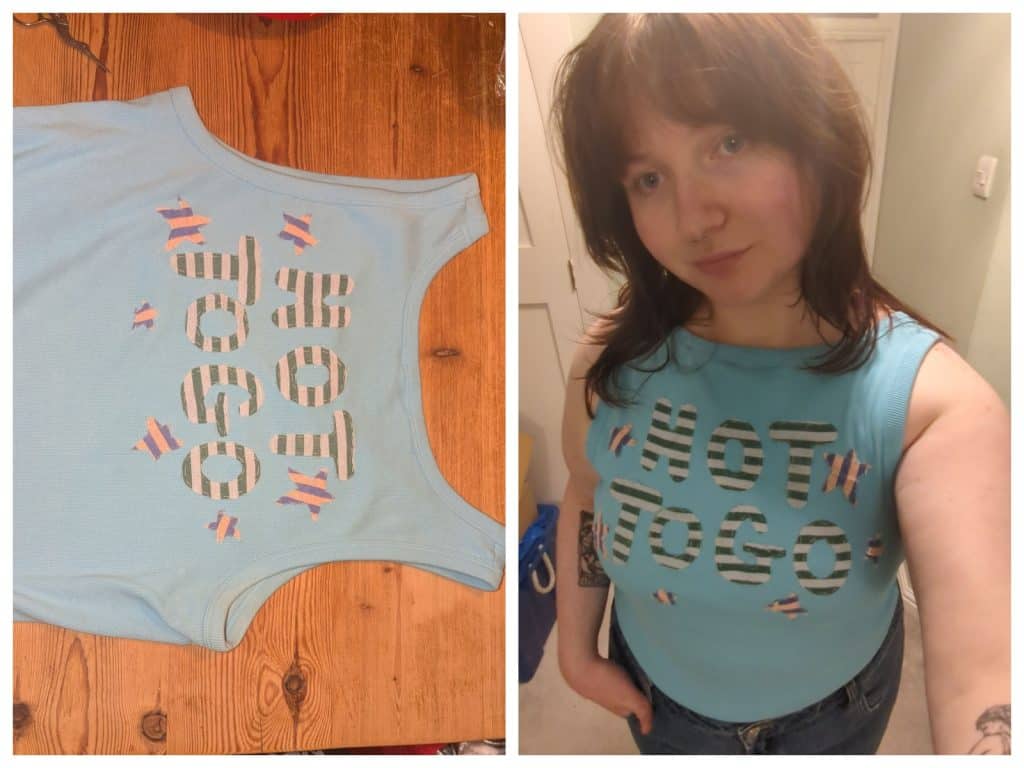
With your merch completed, it’s time to begin styling it. Try styling it for as many different environments as you can so it can be a universal item of clothing. You can try styling it both casually for everyday use and elevated for a concert or club night.
Give it a go
Finding small ways to combat the environmental impact of the music and textiles industry is so important because both industries are major CO₂ and waste emitters and producers. While it may seem like a small step, making your own merch could work to showcase a demand for sustainably sourced merch to artists and their teams.
Making DIY merch is a simple way to reduce your carbon footprint. You don’t need to be a skilled sewer or fashion designer to do so. All you need is a vision and a canvas to showcase your design. Up-cycling materials you already own to do so will add a personal touch and will further reduce the merch’s carbon footprint.


Angie
January 24, 2025 at 11:18 pm
Inspired I’m excited to start making my own merch!
Frances lipnicki
January 29, 2025 at 9:57 am
This is a wonderful combination of art and sustainable fashion..what a great way to inspire others and reduce our footprint..nice to see this generation working for a better world for us all
Jahana
January 28, 2025 at 12:45 pm
Wow, love this
Tara
January 28, 2025 at 6:54 pm
Make my own merch! What an inspiring article. Thank you Emily x
Alison
January 29, 2025 at 10:32 am
A great way to make the music industry more sustainable! Thank you for such an interesting article, Emily.
Simon
February 3, 2025 at 6:30 pm
Wow what excellent ideas