
Finding the perfect holiday gifts can be an added stressor during this busy time of year. However, these three gifts are thoughtful, affordable, and provide a creative outlet along the way! If you are looking for something last-minute, this is the perfect guide. Many of these items are likely lying around your house or sitting in your kitchen.
I have enjoyed experimenting with all three of these crafts this holiday season. They are incredibly approachable for those who may not consider themselves to be “crafty,” and they are budget-friendly! These options emphasize sustainability and using what you have in order to give gifts that are thoughtful and delicious!
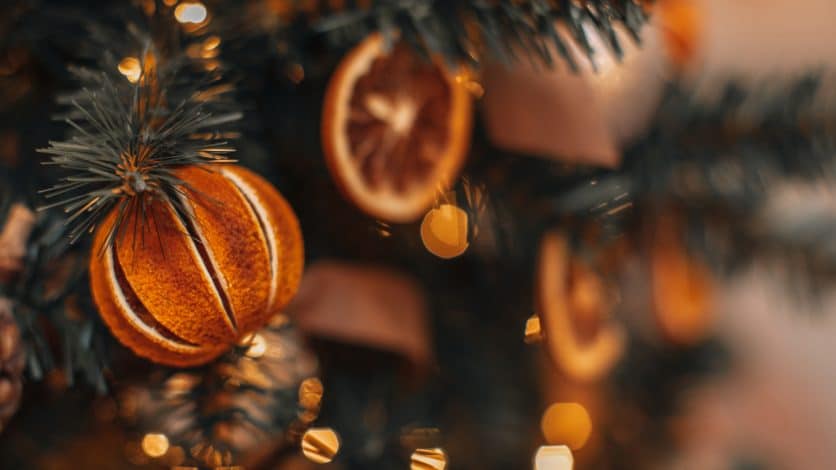
Orange garlands
That bowl of Cuties on the counter that is going bad is about to come in handy! To reduce waste, make your home smell lovely, and create decor that will last for years, slicing them up and drying them out is a perfect holiday craft. There are tons of ways to tackle this project and plenty of creative things you can do with these citrus beauties once they’re dried, but this guide gives you a simple, no-stress starting point to spice up your holiday décor.
Instructions
Step 1: Using a sharp knife, slice your oranges (or any citrus) into thin rounds. It’s important to try to get them as thin and similar as possible. As long as the thickness of the slices is generally similar, they will dry at approximately the same rate. Also, it is essential to make sure you are cutting your oranges with the ends facing outwards, not vertically, so that you get the classic orange slice look.
Step 2: Set your oven to 180 degrees Fahrenheit. This is going to take approximately 3-6 hours, depending on the thickness of your slices.
Step 3: Lay all of the orange slices on baking sheets, ensuring they are flat so they don’t end up curling as they dry out. Some cover them in salt and soak up moisture with a paper towel before putting them in the oven in order to speed up the process, but this is entirely optional.
Step 4: Every hour, flip your slices in order to dry them out evenly and ensure they are relatively flat. They might naturally curl a little, but this makes a big difference. Once they have dried out, they are thin, semi-flexible, and should no longer feel sticky.
Step 5: From here, the possibilities are endless. I have hot-glued the slices together to make a decorative wreath that looks so pretty in the sun. You can also string them up as a beautiful garland that doubles as sun catchers, even incorporating herbs, cinnamon sticks, or dried flowers if you wish to do so. Store them in a Ziploc bag and hang them for 5-6 years!

Homemade marshmallows
I would just like to say thank you, TikTok! My feed has been filled to the brim with crafty creators this season who are sharing wonderful holiday recipes. If you are not a marshmallow enthusiast, I recommend checking out Justine Snacks on her website for other holiday treat ideas. This season, Justine has curated many unique, dietary-inclusive baked goods. That being said, these vanilla maple marshmallows have become a staple in my home during the holidays. They are a luxurious and simple addition to a cozy mug of cocoa. These sweet and fluffy treats also make for a wonderful gift!
Ingredients:
- 1 cup cold water
- 3 tablespoons of grass-fed gelatin
- 1 cup of maple syrup
- 1/4 teaspoon sea salt
- 1 teaspoon vanilla bean paste (or extract)
- Arrowroot powder or powdered sugar to dust them once they are finished
The baking instructions, which are written out in the comments of the video, are easy to follow and don’t require much preparation. Overall, this took less than 30 minutes of active cooking time. They have to sit for approximately six hours, or until the marshmallow mixture is hardened to the touch.
Finally, slice them up, or cut them into cute shapes with cookie cutters, and dust them generously with the powder of your choosing before piling them into tins or jars for a lovely holiday gift.
Custom candles
Thrifting funky jars and containers is a wonderful way to curate candles for your loved ones while being financially and environmentally conscious. Candles are an easy way to mix and match your favorite scents for a personalized gift. Various kinds of wax can be found at your local craft store or Michaels. Beeswax is a great choice for those who want a cozy, warm smell while also prioritizing sustainability. Beeswax burns longer and brighter and is considered to be less harmful than chemicals found in other types of wax.
These creators make it easy for anyone to begin candle making. As a beginner, you do not need to buy expensive wax or even a thermometer. Watch this video for a breezy start to your project! Any containers, jars, or tins are perfect for candle-making.
Wax and wicks are at most craft stores. Michaels is a great option if you just need the basics, although I encourage checking out your local craft store if that is available to you. If you don’t have essential oils hiding in bathroom cabinets, they are also at Michaels, as well as most pharmacies.
Once the wax has been heated over the stove at a low temperature (patience is key!), poured into the container of your choosing, and has begun to set, it is time to add any toppers to the candle. Don’t add them before the wax has started to cool; they will likely sink and will not be visible once your candle is fully hardened. Spices, small crystals, and herbs are an easy way to decorate your candle and customize it for your loved ones. This is such a fun way to get crafty and thoughtful with your gift-giving this year.
Happy Crafting!
Countless crafts and DIY projects for the holiday season don’t require perfection, outstanding levels of skill, or previous knowledge. These are just a few approachable, sustainable, and affordable options for those who want to give intentional and creative gifts this season. This article lists some other financially savvy holiday gift alternatives for those who are looking to consume less and save more this Christmas.
Hopefully, these ideas alleviate your concern about not being “crafty” enough to give handmade gifts. Crafting is for everyone, regardless of skill, and this holiday season is a great time to try out a new project or two!


Susana Flores
December 19, 2025 at 10:45 pm
this is so amazing !!! great ideas and thoughtful writing. great job !